

First, here is a review video, so if you like watching more than reading,
feel free to continue with the video! (I speak in Hungarian but added English captions!)
Unfortunately, I can’t show many pictures
of what my studio looked like before the cabinet arrived. My kids are growing and needed a separate room, so I had to move my scrap stuff to a smaller place.
I was never that super-organized kind of girl, I pretty much knew where my
specific embellishments or tools were, but I spent a lot of time looking for the
many, many little things I needed in my process. When I made a mini album or
scrapbook page, I remembered that I needed epoxy stickers or a little
stitched detail here or there, then the long search began. I spent a lot of
time searching, the stuff took up a lot of space, and the boxes often covered
the whole floor around me. However, this is no longer a problem, the cabinet is
a wonderful solution for organizing.

Let’s talk about how the DreamBox arrived. The cabinet came in a huge wooden box carefully packaged and mounted on its panels, like an IKEA cabinet. I agreed with the carriers to take the wooden box, and we brought the furniture elements into the house together, which was not a problem. But putting it together is a different story. Don’t try to do it alone, you’ll need the help of a skillful family member who loves to. Assembling the cabinet box took us approx. 4 hours. If you live in America, I suggest you order the DreamBox in the prebuilt version.


I will honestly say that since I have my
cabinet, I have rearranged it three times to look for the perfect place for everything.
Fortunately, it’s very simple and quick to change the arrangement, the shelves
are held by small plastic pegs that can be moved in an instant. The shelves and
boxes fit perfectly in each compartment, they are compatible with each other.
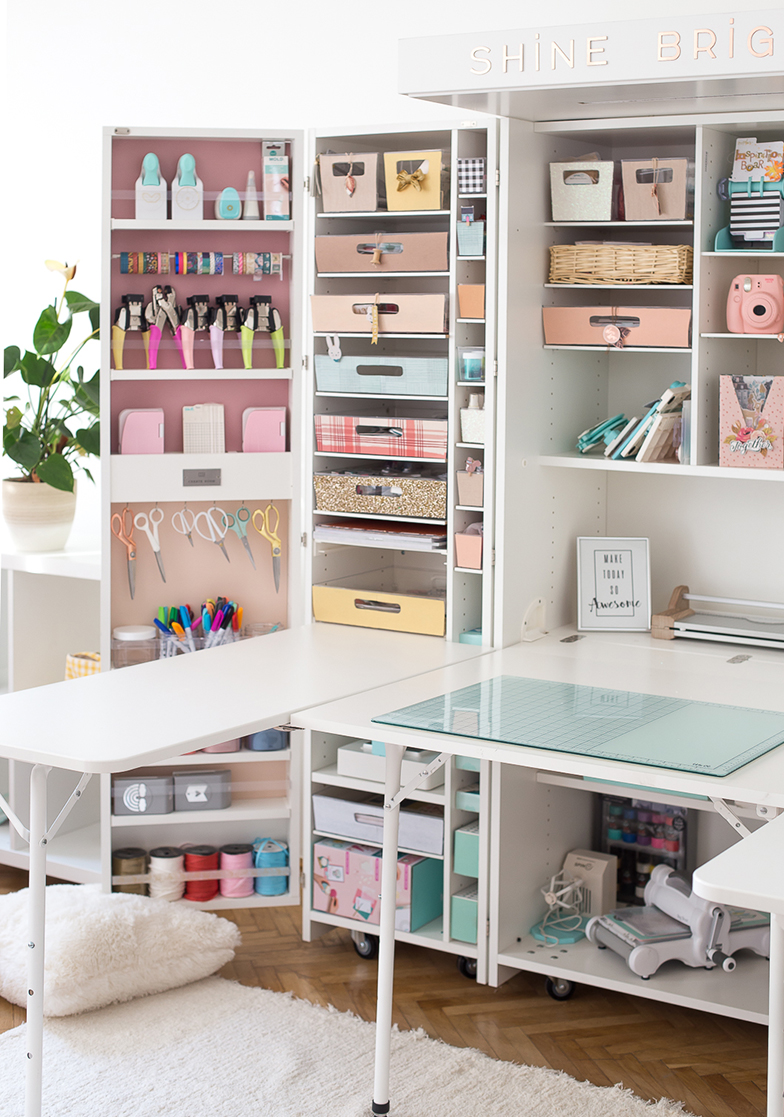
The size of the boxes is perfect for a
scrapbooker! I was very happy to see that the 12x12 inches papers smoothed out
nicely, I could put the accessories on top so I finally didn’t have to keep the
paper collections in plastic bags but could store them one by one in these
pretty boxes.
I decided to cover the front of the totes with felt or paper to make the cabinet look more uniform. Of course, this is
not necessary, many times it helps to organize when you see what is in the box.
Since I see mostly the edges of the papers and stickers from the outside, it
came out better for me to put a label on the boxes and thereby mark what was
inside. To be honest, I enjoyed so much the decoration process of the closet
and I really like the end result.


The arrangement of my creative supplies went pretty quickly, there are plenty of options for organizing in the cabinet, there is perfect space for scissors, washi tapes, papers, everything finds a place immediately. And best of all, when we’re finished with our creative project, we can simply close the cabinet and the room is tidy again. I put everything into the cabinet what you can see in the photo, and left free space for more stuff to put in!

Here you can see the closet closed, really pretty, fits my room. The cabinet rolls on wheels, it can be easily moved from one corner of the room to another. I chose it in the white version, but it is available in several versions.


Ohmygod..♥️🤩🤩🥰
ReplyDeleteThis is supercoool.
Really💐♥️🥰🥰
I've never seen such a dream room in such a little space. You made it look even better with your final touch. I think it was a great idea to enlarge the table. I was wondering what is the little optional ceiling for? Has it something to do with the lights?
ReplyDeleteThank you for sharing this!!!